
Vaulting Pole Guide: Essential Tips for 2026 Athletes
Reaching new heights in pole vaulting depends not only on athletic skill, but also on mastering the art of vaulting pole selection and technique. For athletes striving for peak performance in 2026, the right vaulting pole can be the difference between a personal best and a missed attempt. This comprehensive guide delivers essential tips, expert insights, and step-by-step strategies to help you choose, use, and care for your equipment. Explore the latest in pole types, materials, safety practices, and training tactics, then apply these proven methods to elevate your vaulting results this season.
Understanding Vaulting Poles: Types and Materials
Selecting the right vaulting pole is a foundational step for any vaulter aiming to maximize performance. The variety of pole types, materials, and technological advancements can be overwhelming, but understanding these differences empowers athletes to make informed choices for their skill level and goals.
Overview of Vaulting Pole Types
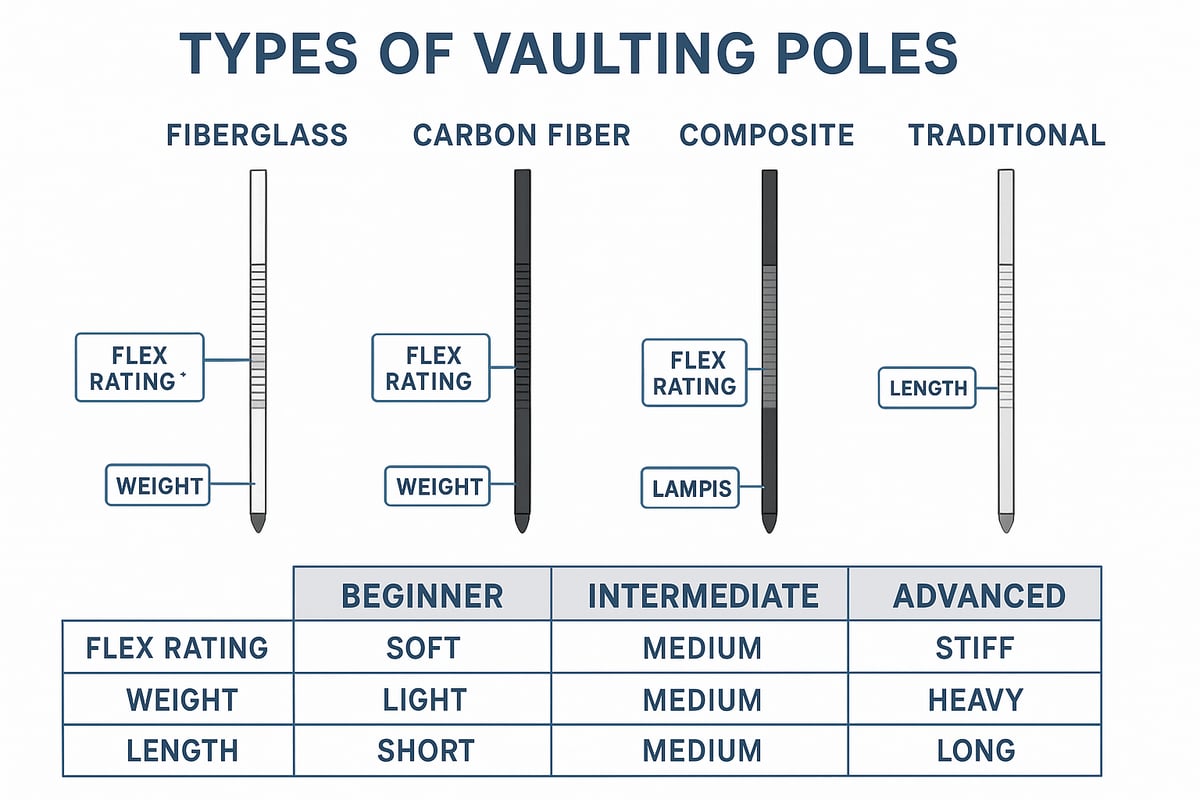
Vaulting poles come in several types, each tailored to different experience levels and competition needs. Most modern poles are constructed from fiberglass or carbon fiber, while some composite and traditional options remain available.
For beginners, poles like the Pacer One offer more forgiving flex and are designed for easy handling. Intermediate vaulters often transition to models such as UCS Spirit, which provide a balance between flexibility and power. Advanced and elite athletes typically use high-performance options like the Pacer Composite, engineered for maximum energy return.
The vaulting pole you select should match your body weight, skill, and event requirements. Poles vary in length, ranging from youth sizes up to elite competition standards. Choosing the correct weight rating ensures safety and progression.
| Level | Example Pole | Material | Flexibility | Weight Range |
|---|---|---|---|---|
| Beginner | Pacer One | Fiberglass | High | 80–140 lbs |
| Intermediate | UCS Spirit | Composite | Medium | 120–180 lbs |
| Advanced | Pacer Composite | Carbon Blend | Low | 140–210 lbs |
The right vaulting pole can help athletes achieve optimal takeoff, swing, and clearance.
Key Materials Used in Modern Poles
Fiberglass is the most widely used material in vaulting poles, prized for its flexibility and resilience. It allows for a controlled bend and a consistent rebound, making it suitable for all levels.
Carbon fiber, on the other hand, is lighter and stiffer. This material is favored by elite vaulters who need increased stiffness and faster energy return. Some brands use proprietary blends like T2-Fiber or S-Glass to fine-tune pole characteristics for advanced performance.
Pros and cons of main materials include:
- Fiberglass: Durable, cost-effective, but slightly heavier.
- Carbon fiber: Lightweight, responsive, but more expensive and less forgiving for beginners.
- Proprietary blends: Customizable for specific needs, often seen in high-level competition.
Recent market trends indicate a growing preference for carbon fiber vaulting poles among top athletes, driven by their performance advantages.
Innovations and Trends for 2026
Vaulting pole technology has advanced rapidly, with manufacturers introducing lighter and stronger materials that enhance energy transfer. New proprietary blends, such as the Pacer Composite’s T2-Fiber and carbon matrix, offer improved performance for next-generation athletes.
Customization is now a key feature. Poles can be tailored to an athlete’s height, grip size, and jumping style. Sustainability is also becoming a priority, with some companies using recycled materials and eco-friendly processes.
These innovations lead to better energy return, less fatigue, and more consistent vaults. As a result, pole selection is more personalized than ever before, setting new standards for competitive vaulting.
Choosing the Right Pole for Your Level
Matching the vaulting pole to your experience and aspirations is critical. High school athletes typically begin with flexible fiberglass poles, while collegiate vaulters may require stiffer, longer models as their technique and strength improve.
Elite athletes often upgrade to carbon fiber or composite poles for higher performance. Consider this case: a high school vaulter starts with a Pacer One, then transitions to a Pacer Composite as their personal best increases. Consulting with coaches and equipment experts is vital, as is referencing up-to-date manufacturer guidelines for 2026.
For those seeking a wide range of options, Track and Field Equipment collections can help compare current models and specifications.
Common Myths About Vaulting Poles
There are several misconceptions about vaulting pole selection:
- Myth: Stiffer poles are always better.
- Fact: The pole must suit the athlete’s weight, skill, and technique.
- Myth: All materials perform the same.
- Fact: Materials like carbon fiber and fiberglass offer distinct flex and rebound qualities.
- Myth: Upgrading poles guarantees higher jumps.
- Fact: Technique, training, and pole compatibility are equally important.
Clarifying these points helps athletes avoid costly mistakes and choose the best vaulting pole for their needs.
Selecting Your Ideal Vaulting Pole: Step-by-Step Guide
Choosing the right vaulting pole is a pivotal decision for every athlete aiming for consistent improvement and safety. With many options available, a systematic approach ensures you select a pole that matches your current abilities while supporting future progression. Let’s break down the selection process into five essential steps every vaulter and coach should follow.
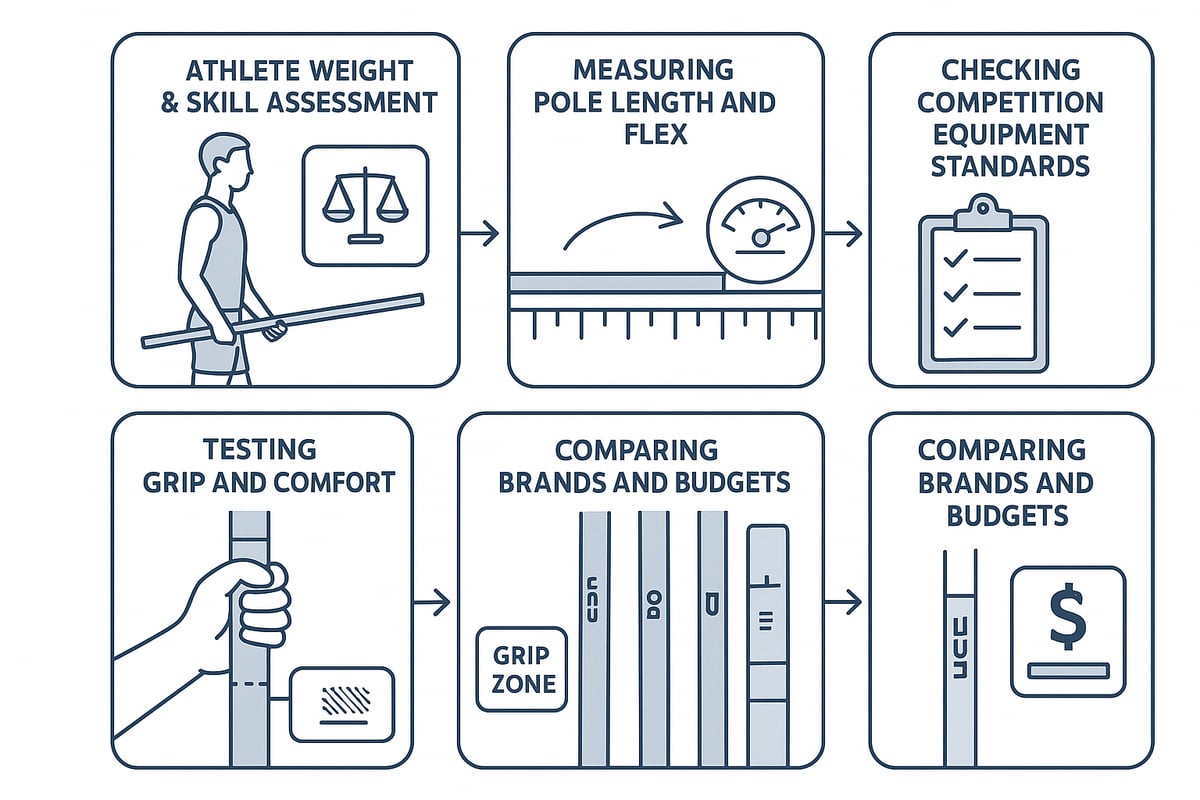
Step 1: Assessing Athlete Weight and Skill Level
Begin by accurately measuring your body weight, as every vaulting pole is manufactured with a specific weight rating. Using a pole rated below your weight increases the risk of breakage, while an excessively stiff pole may prevent safe takeoff. Match the pole’s rating to your current weight, then consider your skill level. For example, high school athletes often start with forgiving models like the Pacer One, while advanced vaulters may need the Pacer FXV for more aggressive bends. Always reassess as your technique improves or your weight changes.
Step 2: Determining Optimal Pole Length and Flex
The length and flex of your vaulting pole directly affect your ability to reach new heights. Manufacturers provide charts to help match pole length to your personal record (PR) and grip height. Generally, youth vaulters use poles between 12–13 feet, collegiate athletes move to 14–15 feet, and elites may use poles up to 17 feet. The flex rating, typically printed on the pole, determines how much energy you can store and release during a vault. Adjust both factors as your approach speed and technical skills progress.
Step 3: Considering Event and Competition Requirements
Before investing in a vaulting pole, review the rules set by governing bodies like NFHS, NCAA, or World Athletics. Each organization specifies minimum and maximum pole lengths, flex tolerances, and safety features. Event type also matters; indoor competitions may favor slightly shorter, more flexible poles, while outdoor meets require adjustments for wind and weather. When preparing for official events, consult your coach and review Field and Facility Equipment guidelines to ensure your gear meets the latest standards for 2026.
Step 4: Testing and Adjusting for Personal Comfort
Every vaulter has a unique grip preference and hand size, making hands-on testing essential. Visit a local supplier or training facility to try different pole diameters and grip textures. Models like the Pacer Mystic cater to smaller hands, while others offer thicker grips for added control. Work with your coach to trial several options during practice sessions, adjusting grip height and pole choice until you find the vaulting pole that feels natural and secure during your approach and takeoff.
Step 5: Budget, Availability, and Brand Comparison
Vaulting poles vary widely in price, from entry-level options around $379 to elite models exceeding $1,400. Compare leading brands such as UCS Spirit, Skypole, Pacer, and Bifrost, focusing on reputation, durability, and warranty. In 2026, some models may have extended lead times due to increased demand, so plan your purchase well in advance of key competitions. Always balance your budget with quality, considering manufacturer recommendations and available upgrades as your needs evolve.
Mastering Vaulting Technique: Fundamentals and Drills
Perfecting your vaulting pole technique is essential for athletes aiming to achieve new heights in 2026. Every phase, from grip to landing, requires precision and consistency. By focusing on fundamental skills and structured drills, you can unlock your full potential with the vaulting pole.
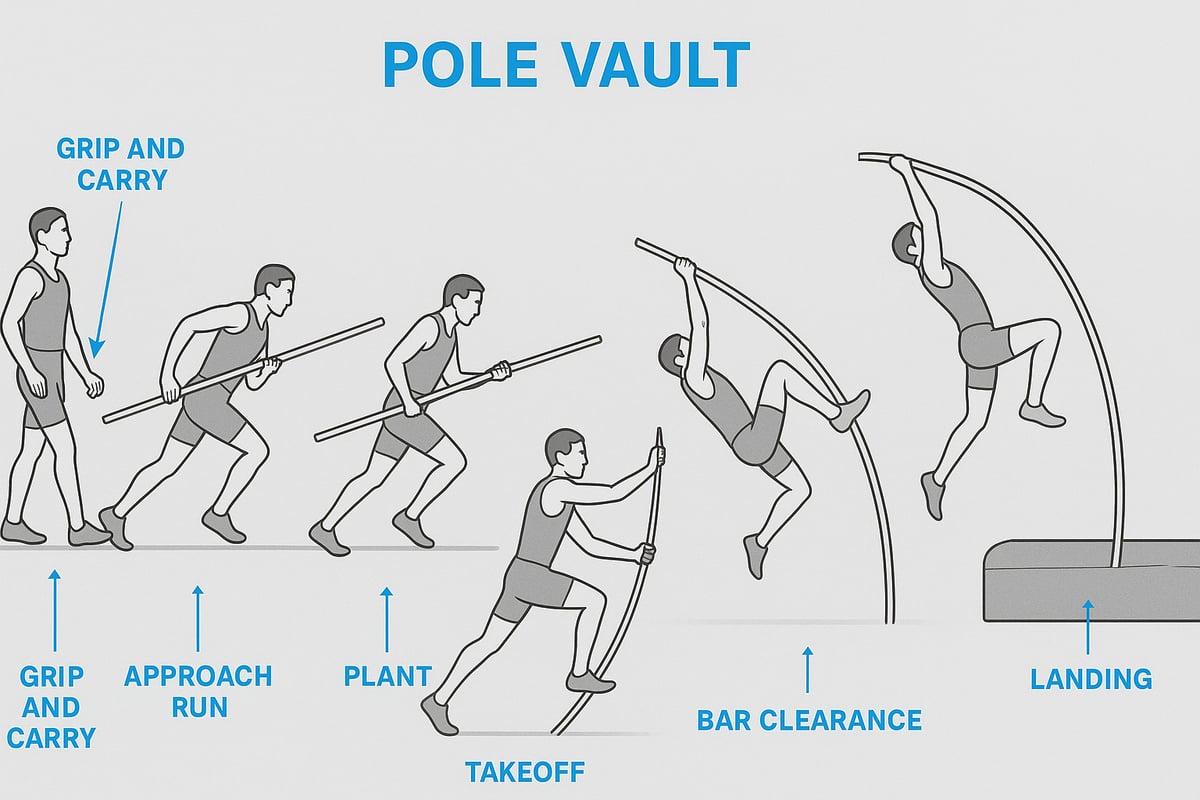
Grip, Carry, and Plant Mechanics
The way you grip the vaulting pole sets the foundation for your entire vault. Both hands should be positioned shoulder-width apart, with the top hand near the end of the vaulting pole and the bottom hand placed according to your preferred grip height.
Maintain firm, but not tense, grip pressure. The carry position should be comfortable, allowing you to accelerate smoothly during your approach. When planting, drive the vaulting pole tip into the box assertively, aligning your arms and shoulders for optimal energy transfer.
Common errors include gripping too tightly, uneven hand spacing, or failing to keep the pole upright. To correct these, practice with varied grip heights and consult your coach for personalized adjustments.
Approach Run and Takeoff Dynamics
A consistent approach run is crucial for maximizing the performance of your vaulting pole. Focus on building controlled speed, maintaining upright posture, and syncing your strides for rhythm.
As you near the plant, transition smoothly by lowering the vaulting pole and preparing for takeoff. Proper foot placement ensures you transfer momentum efficiently from the ground to the vaulting pole.
Top vaulters often reach approach speeds between 7 and 9 meters per second. Practicing with markers or visual cues can help you refine your approach and develop muscle memory for competition.
Swing-Up and Rockback Execution
The swing-up and rockback are pivotal moments in vaulting pole technique, converting forward motion into vertical lift. After takeoff, drive your trail leg upward while keeping your core engaged and arms extended along the vaulting pole.
Focus on a fluid, explosive swing, followed by a rapid rockback as your hips rise above your shoulders. Effective timing and strength in this phase can add crucial centimeters to your vault.
For specific drills to refine your swing phase, consider reviewing Drills for a Better Pole Vault Swing, which offers targeted exercises to improve efficiency and power.
Bar Clearance and Landing Techniques
Clearing the bar with minimal contact requires precise body control and awareness of your vaulting pole's response. As you reach the peak, initiate a controlled turn and extension to position your body over the bar.
Keep your legs together and avoid dropping your hips prematurely. Rotate your shoulders and release the vaulting pole at the right moment to maximize clearance and prepare for a safe landing.
Landing technique is equally vital. Always aim for a balanced, feet-first landing in the center of the pit, absorbing impact with bent knees to reduce injury risk.
Drills and Progressions for Skill Development
Progressive drills are essential for mastering each phase of vaulting pole technique. Start with plant drills to reinforce hand placement, then advance to short-run vaults focusing on approach and takeoff mechanics.
Include gymnastic swings and core exercises to build the strength needed for swing-up and rockback. Structure training sessions with clear objectives, alternating between technical drills and full-vault repetitions.
Regular practice, combined with video feedback, can highlight areas for improvement and accelerate skill acquisition.
Coaching Tips and Athlete Insights
Top coaches emphasize adapting your technique to the characteristics of your vaulting pole. For example, stiffer poles may require a faster approach, while more flexible poles allow for greater energy return with refined timing.
Utilize feedback loops, such as video analysis and performance data, to track progress and make real-time adjustments. Many elite vaulters adjust their grip height or approach based on feedback from recent jumps.
Stay open to experimentation and communicate regularly with your coach to ensure your vaulting pole technique evolves alongside your athletic development.
Safety and Injury Prevention in Pole Vaulting
Staying safe while pursuing new heights with a vaulting pole is essential for every athlete. Injury prevention depends on a combination of equipment checks, smart preparation, facility awareness, and rapid response to common injuries. Here is how to safeguard your vaulting experience at every stage.
Equipment Safety Checks and Maintenance
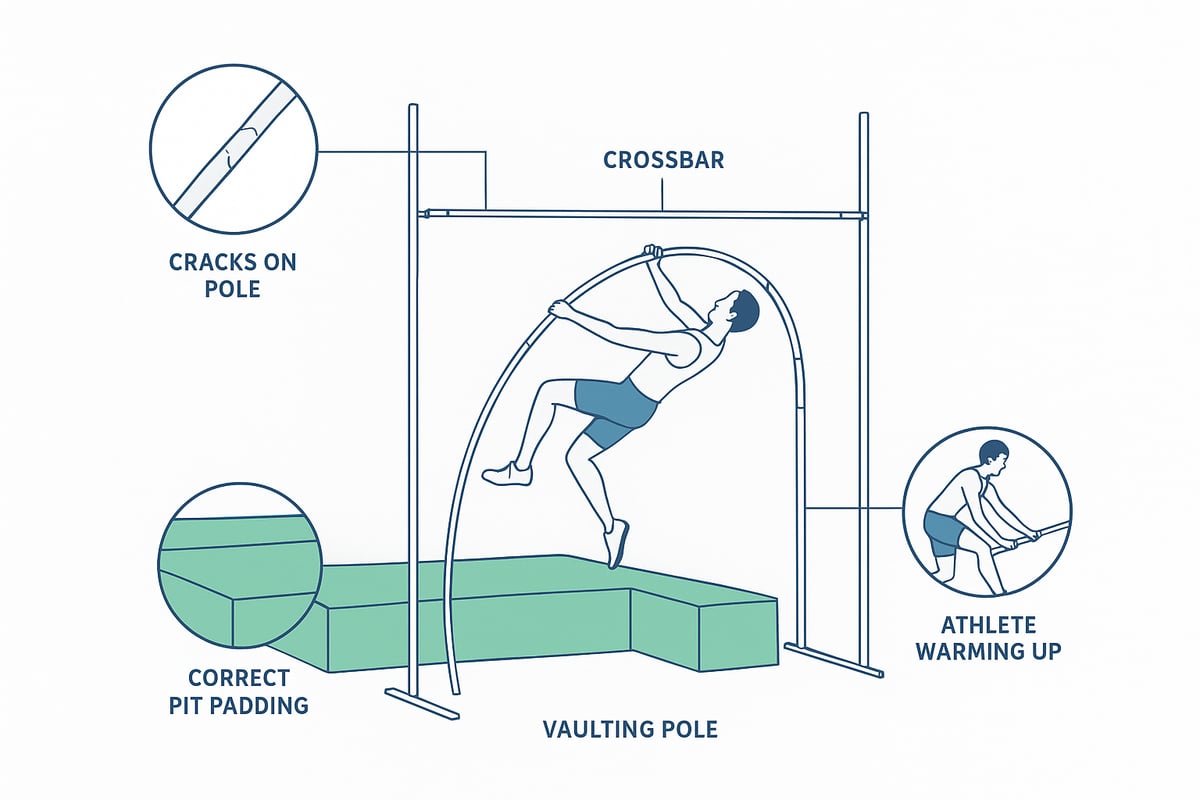
Regularly inspecting your vaulting pole is the first step to preventing accidents. Look closely for cracks, splintering, or surface wear, especially near the ends. Even minor damage can compromise the pole’s integrity.
Make sure each vaulting pole has a properly fitted tip or butt plug. This small component protects both the pole and athlete during plant and takeoff. After every use, wipe down the pole to remove dirt and sweat, which can degrade materials over time.
Follow a weekly checklist:
- Examine for visible damage
- Test pole flexibility
- Check butt plug security
- Store in proper conditions
According to industry data, most pole failures occur due to undetected microfractures. By catching issues early, you ensure your vaulting pole stays competition-ready and safe.
Proper Warm-Up and Conditioning
A thorough warm-up primes your body for the dynamic demands of using a vaulting pole. Dynamic stretches, mobility drills, and light plyometrics activate muscles and joints, reducing the risk of strains or sprains.
Key warm-up steps before vaulting:
- Dynamic leg swings and arm circles
- Core activation exercises
- Short sprints and bounding drills
Proper conditioning focuses on the shoulders, wrists, and ankles, all critical for vaulting pole control. For detailed routines, review the Pole Vault Warm-Up and Conditioning guide, which offers expert exercises tailored for vaulters.
Consistent preparation ensures your body is resilient against injury, letting you focus on refining vaulting pole technique.
Pit, Standards, and Surroundings Safety
Ensuring the safety of your landing area is just as crucial as selecting the right vaulting pole. Verify that the pit meets size and padding standards set by your governing body. The pit should fully cover the drop zone and remain securely positioned throughout practice and competition.
Before each session:
- Inspect pit for tears or compression
- Confirm standards and crossbar are stable
- Check for obstacles or hazards near the runway
Modern pit designs have significantly reduced injury rates. A safe environment allows athletes to push their limits with confidence, knowing their vaulting pole efforts are fully supported.
Common Vaulting Injuries and Recovery Tips
Despite precautions, injuries can occur with any vaulting pole. The most frequent issues include wrist sprains, shoulder strains, and pole burns. Early signs such as persistent soreness or swelling should never be ignored.
Prevention strategies:
- Maintain proper form during takeoff and landing
- Use grip tape to reduce friction burns
- Prioritize rest after intense sessions
If an injury happens, follow immediate care protocols: ice, compression, and professional assessment. Most athletes can return to vaulting pole training after a tailored rehabilitation plan. Elite vaulters often share that early intervention and patience are key for a safe and effective comeback.
Caring for Your Vaulting Pole: Storage, Transport, and Longevity
Proper care of your vaulting pole is essential for both safety and peak performance. Neglecting storage, transport, or routine maintenance can shorten a pole’s lifespan and increase the risk of failure. By following best practices, you can maximize your equipment investment and stay competition-ready year-round.
Safe Storage and Handling Practices
Storing your vaulting pole correctly prevents warping, microfractures, and UV damage. Always keep poles in a dry, moderate-temperature space, away from direct sunlight and moisture. Use horizontal racks with full-length support to avoid bending or sagging.
For added protection, consider padded sleeves or bags, especially in shared storage areas. Professional teams often rely on specialized pole racks designed to minimize contact points and stabilize each vaulting pole securely. Regularly inspect the storage area for hazards like heavy objects that could fall or sharp edges that might scratch the surface.
For more options, explore Carts and Storage Solutions designed specifically for vaulting pole safety and longevity.
Best Practices for Pole Transport
Transporting a vaulting pole requires careful planning to prevent accidental impact or stress. Use a pole bag or hard case to shield the pole from knocks during travel. Always secure the pole horizontally in vehicles, ensuring it does not slide or flex.
If traveling by bus or airline, check current guidelines for 2026, as many carriers have specific rules for oversized sports equipment. Label your pole bag with contact information for quick identification. For team travel, use dedicated carts or storage containers that prevent shifting and damage on the road.
Quick checklist for transport:
- Padded bag or case
- Secure horizontal positioning
- Protection from weather and direct sun
- Compliance with travel regulations
Cleaning, Inspection, and Minor Repairs
Routine cleaning and inspection help maintain the integrity of your vaulting pole. Wipe down the surface with a soft cloth and mild soap, avoiding harsh chemicals that can degrade fiberglass or carbon finishes. Inspect for surface cracks, chips, or signs of delamination after each session.
If you notice minor scuffs, smooth them gently with fine-grit sandpaper. Never use tape that leaves residue, as this can attract grit and moisture. For any structural damage, consult a professional before returning the vaulting pole to use, as hidden flaws can compromise safety during vaults.
Tip: Keep a maintenance log to track inspections and repairs, ensuring issues are addressed before they become serious.
Signs It’s Time to Replace Your Pole
Knowing when to replace a vaulting pole is critical for safety. Warning signs include visible cracks, splintering, deep gouges, or significant loss of stiffness. If the pole feels different during use or fails to return to its original shape, it may be fatigued.
Manufacturers typically recommend replacing poles after several years of consistent use or sooner if used in extreme conditions. Data shows that poles used in high school programs last 3–5 years, while elite athletes may need replacements more frequently due to higher stress loads.
Never ignore unusual noises, flex, or surface defects. When in doubt, retire the vaulting pole and consult your coach or equipment supplier for guidance.
Advanced Training Strategies for 2026 Athletes
Modern athletes know that a well-structured training plan is crucial for vaulting pole success. With evolving technology, nutrition, and coaching methods, staying ahead means adopting advanced strategies designed for the 2026 season.
Periodization and Seasonal Planning
Effective vaulting pole training begins with periodization. This approach divides the year into blocks: preparation, competition, and recovery. Each block targets different aspects, from building foundational strength to refining peak performance.
Coaches recommend mapping out training cycles to avoid burnout and maximize gains. In the pre-season, focus on general conditioning, technical drills, and gradual vaulting pole progression. During competition season, shift to event-specific workouts, maintaining sharpness without overtraining.
A sample periodization table:
| Phase | Focus | Duration |
|---|---|---|
| Pre-Season | Strength, technique | 8-12 weeks |
| In-Season | Speed, event practice | 12-16 weeks |
| Transition | Recovery, flexibility | 4-6 weeks |
Planning ensures steady improvement and readiness for major competitions.
Integrating Technology and Data Analysis
Technology is transforming vaulting pole training. Wearable sensors now track approach speed, takeoff angles, and bar clearance, providing instant feedback. Video analysis platforms highlight technical strengths and areas for improvement.
Many athletes use pole vault approach drills alongside data analytics to fine-tune their rhythm and plant mechanics. By reviewing data after every session, you can make targeted adjustments to your vaulting pole technique.
Top vaulters log their metrics, compare progress over time, and collaborate with coaches to set precise goals. Embracing these tools gives you a competitive edge in 2026.
Strength, Speed, and Flexibility Training
Physical conditioning is the engine behind every successful vaulting pole performance. Strength routines should target the core, shoulders, and grip. Olympic lifts, pull-ups, and medicine ball throws build explosive power.
Plyometric drills, such as bounding and hurdle hops, translate directly to runway speed and takeoff. Flexibility work, including dynamic stretching and yoga, prevents injuries and supports full range of motion. For detailed swing mechanics, athletes can utilize pole vault swing technique resources to perfect their form.
A balanced program that integrates these elements will help you harness the full potential of your vaulting pole.
Mental Preparation and Competition Readiness
Success with a vaulting pole is as much mental as physical. Visualization exercises help athletes rehearse perfect jumps, building confidence and focus. Consistent pre-meet routines, including meditation and breathing techniques, reduce anxiety and enhance performance.
Handling setbacks is key. Top performers view missed attempts as learning opportunities. Working with sports psychologists or mental coaches is increasingly common, providing tools to manage stress and maintain motivation.
Building mental resilience ensures you are ready to deliver your best when it counts.
Nutrition and Recovery for Peak Performance
Fueling the body correctly is essential for vaulting pole athletes. A balanced diet rich in lean proteins, complex carbohydrates, and healthy fats supports muscle repair and sustained energy. Hydration strategies, like drinking water regularly and using electrolytes, prevent cramps and fatigue.
Sleep is a cornerstone of recovery. Aim for 8–10 hours per night to maximize adaptation and reduce injury risk. Post-training routines, such as foam rolling and stretching, speed up recovery and prepare you for the next session.
Attention to nutrition and rest helps your vaulting pole performance reach new heights.
Expert Q&A: Insights from Elite Vaulters and Coaches
What do top vaulters and coaches recommend for 2026? Experts emphasize the importance of adapting your vaulting pole to your evolving skills, regularly updating training plans, and seeking feedback after every session.
Common questions involve breaking through plateaus and mental blocks. Champions suggest varying drills, analyzing video, and not being afraid to adjust grip height or pole choice. Staying open to innovation and expert advice is critical for ongoing progress.
Elite insights can turn your vaulting pole journey into a path of continuous achievement.