
Ultimate Guide to Choosing the Best Slackline Kit 2026
Slacklining is capturing global attention in 2026, with more people than ever stepping onto the line for balance, fun, and fitness. Yet, choosing the right slackline kit can feel overwhelming, especially for those just starting or looking to upgrade.
This guide will help you navigate the options with a clear, step-by-step process for selecting a slackline kit that fits your skill level, goals, and budget. We will cover kit types, key features, safety essentials, setup strategies, top recommendations, and advanced tips.
Ready to make an informed decision and start your slacklining journey? Let’s get started.
Understanding Slacklining: Types and Disciplines
Slacklining has transformed from a niche pastime to a global sport, drawing participants of all ages and backgrounds. Over the past decade, this activity has seen a significant rise in both popularity and accessibility. According to recent Slackline U.S. Participation Estimates, the number of active slackliners continues to increase, reflecting a strong interest in balance-based recreation.
People are drawn to slacklining for its unique combination of physical challenge and mental focus. The sport improves balance, enhances core strength, sharpens concentration, and offers a fun way to enjoy the outdoors. Whether in city parks or remote natural settings, the right slackline kit makes it easy for anyone to get started and experience these benefits.
The Evolution and Growth of Slacklining
Slacklining began as a creative offshoot of climbing culture, where athletes balanced on webbing between trees. Since then, it has evolved into a recognized sport, with competitions, community events, and a growing commercial market. Sales of slackline kit options have surged, making them accessible to families, schools, and adventure seekers alike.
Data shows that slacklining is not just a trend but a sustained movement. Reports indicate steady increases in slackline kit purchases year after year, with more people embracing the activity for fitness, recreation, and social connection. The sport’s appeal lies in its versatility—accessible to beginners, yet challenging enough for advanced practitioners.
Main Slackline Disciplines Explained
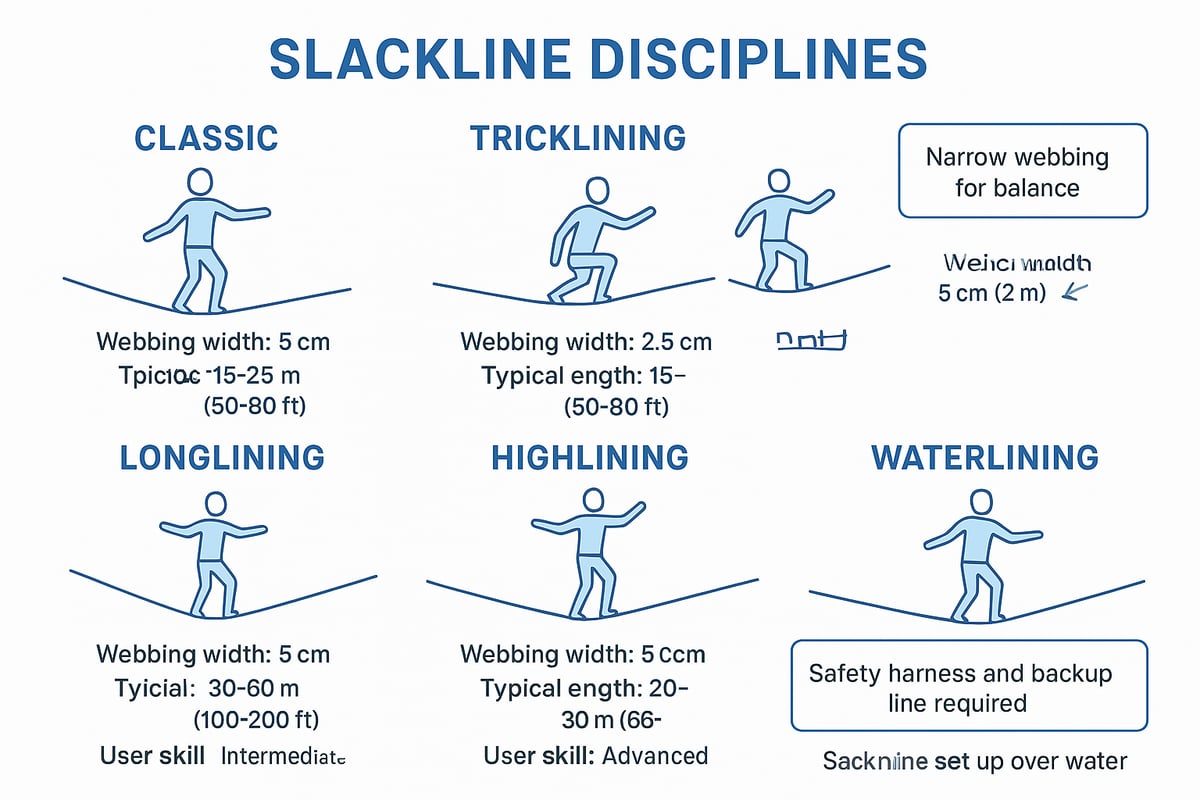
Slacklining encompasses several disciplines, each with its own unique requirements and appeal. Understanding these differences is key to selecting the most suitable slackline kit for your needs.
- Classic/Basic Slacklining: Uses 1–2 inch webbing over short distances, typically 10–15 meters. Ideal for learning balance and basic walking. Most starter slackline kit packages focus on this style.
- Tricklining: Features dynamic, high-tension lines designed for jumps, spins, and aerial tricks. Requires a robust slackline kit with reinforced webbing and secure ratchet systems.
- Longlining: Involves lines over 30 meters, demanding advanced tensioning and specific slackline kit components for stability and low stretch.
- Highlining: Performed at height, often between cliffs or buildings. Specialized slackline kit equipment, including harnesses and safety leashes, is essential. Not recommended for beginners.
- Waterlining and Other Variants: Waterlining is slacklining over water, offering a safe way to practice falls and tricks. Other forms include rodeo lines and yoga slacklining, each requiring tailored slackline kit features.
Choosing the right discipline means understanding what each style entails and matching your slackline kit to those demands. This ensures safety, fun, and room for progression.
How Your Goals Influence Kit Choice
Selecting a slackline kit depends heavily on your personal goals and who will use the kit. Beginners and families often prioritize stability, easy setup, and safety, making basic kits with wider webbing a smart choice. Those seeking fitness benefits may prefer kits that support longer lines for endurance and balance training.
Intermediate or advanced users might opt for a slackline kit designed for tricklining or longlining, including advanced tensioning systems and durable materials. For instance, a kit intended for backyard play with children should focus on safety and simplicity, while a kit for competition prep must support higher tension and specialized accessories.
Consider these example scenarios:
- A family wants a slackline kit for weekend fun and kids’ balance games.
- An athlete is training core strength and needs a long, stable line.
- A group plans to set up a trickline for practicing advanced moves.
By aligning your objectives with the features of a slackline kit, you ensure a rewarding and safe slacklining experience.
Key Components of a Slackline Kit
Choosing the right slackline kit begins with understanding all its core components. Each part—from webbing to accessories—affects your experience, safety, and progression. Let’s break down what makes up a quality slackline kit so you know exactly what to look for.

Webbing: Material, Width, and Length
The webbing is the heart of any slackline kit. Most kits use either 1-inch or 2-inch wide webbing. Beginners often start with 2-inch webbing for its stability, while 1-inch lines offer more challenge and are favored for advanced moves.
Common materials include polyester, nylon, and high-tenacity polyfilament. Polyester webbing is low-stretch and durable, making it ideal for learning. Nylon provides more stretch, which some users prefer for dynamic tricks. The standard length for a slackline kit is around 15 meters (49 feet), but longlines can reach 30 meters or more. Always ensure your slackline kit includes webbing that matches your skill level and intended use.
A quick comparison table:
| Webbing Type | Width | Material | Best For |
|---|---|---|---|
| Basic | 2 inch | Polyester/Nylon | Beginners, family |
| Trickline | 2 inch | Stretchy Nylon | Tricks, jumps |
| Longline | 1 inch | Polyfilament/Nylon | Advanced, distance |
Tensioning Systems: Ratchet vs. Primitive vs. Pulley
A slackline kit’s tensioning system determines how easy it is to set up and adjust your line. Ratchet systems are the most common, especially in beginner kits, because they offer quick setup and simple tensioning. However, some users report ratchets can be tricky to release, especially after heavy use.
Primitive systems use carabiners and webbing to create tension manually. These are lighter and more compact but require more skill to operate. Pulley systems are designed for longlines and advanced users, providing high tension with less effort. When choosing a slackline kit, consider which system aligns best with your goals and comfort level.
Anchors and Tree Protection
The anchors in a slackline kit keep your line secure. Most kits use slings or wraps that loop around solid anchor points, such as trees or posts. It is vital to use tree protection—thick pads or sleeves—to prevent damage to both the tree and your webbing. Many modern kits include tree-friendly designs, which help distribute force and minimize environmental impact.
Always inspect your slackline kit’s anchors for signs of wear, and choose kits that prioritize safety and responsible outdoor use.
Accessories and Add-ons
A complete slackline kit often comes with helpful accessories. Carrying cases allow for easy transport, while line sleeves protect webbing from abrasion. Some kits add wind dampeners, webbing soap for cleaning, and extenders for longer setups. Advanced slackliners may use leash rings, harnesses, or protective pads for highlining and tricklining.
For those looking to expand their collection, the Outdoor Equipment Selection is a great place to find slackline kit accessories, replacement parts, and additional outdoor gear.
Weight, Portability, and Storage
Portability is a key factor in choosing a slackline kit. Many kits weigh between 3 and 7 pounds, making them easy to pack and carry to parks, backyards, or on trips. Look for compact carrying bags and consider the kit’s packed dimensions if you plan to travel often.
Proper storage—keeping your slackline kit dry and out of direct sunlight—extends its lifespan and ensures peak performance each session.
How to Choose the Best Slackline Kit: Step-by-Step Guide
Choosing the right slackline kit may seem overwhelming, but a structured approach makes the process simple and rewarding. By following these seven steps, you will ensure your slackline kit matches your skill level, goals, and budget.
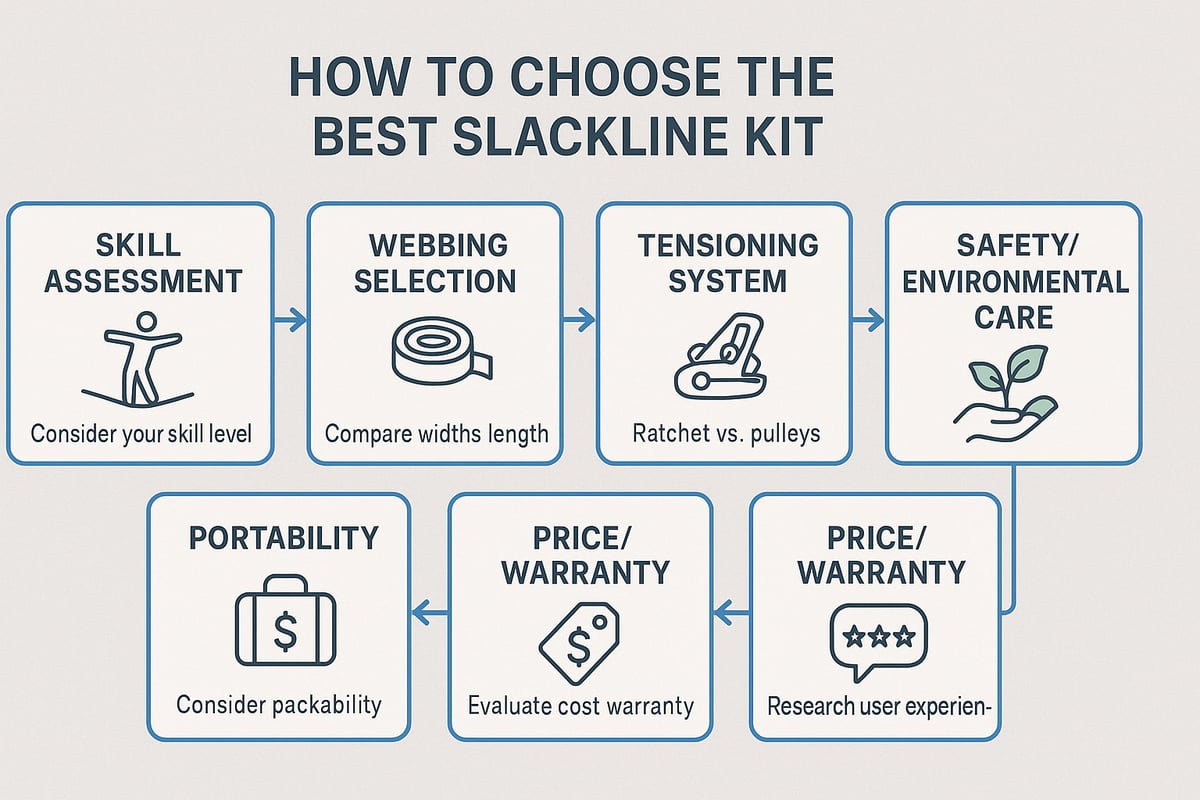
Step 1: Assess Your Skill Level and Intended Use
Start by honestly evaluating your experience and how you plan to use your slackline kit. Are you a complete beginner, an intermediate user, or looking to advance your skills? Think about whether you want a slackline kit for solo practice, family activities, or fitness training. If improving balance and core strength is your main goal, consider exploring Shop Fitness and Training Gear for complementary equipment. This self-assessment will steer you toward the right slackline kit for your journey.
Step 2: Select the Right Webbing and Kit Type
The webbing is the heart of any slackline kit. Beginners often benefit from 2-inch wide webbing, which offers more stability and is easier to walk on. Advanced users may prefer 1-inch webbing for more technical lines or longlining. The material—such as polyester, nylon, or polyfilament—affects stretch and durability. Consider the typical length of a slackline kit: shorter lines are great for limited spaces, while longer ones suit progression. Choose the combination that best matches your intended use and available space.
Step 3: Evaluate Tensioning Mechanisms
Tensioning systems can make or break your slackline kit experience. Ratchet systems are common in starter kits and are known for their ease of setup, but some users report challenges with releasing the ratchet. Primitive systems are lighter and simpler but require manual effort and practice. Pulley systems are best for longlines where high tension is needed. Think about how much time you want to spend setting up your slackline kit and whether you value convenience over manual control.
Step 4: Prioritize Safety and Environmental Responsibility
Safety should never be compromised when selecting a slackline kit. Look for kits that include tree protection to minimize environmental impact and prevent damage to anchor points. Always check the weight limit of your slackline kit—most support up to 300 lbs. Use level ground for setup, inspect anchors before each session, and supervise children at all times. A slackline kit with robust safety features ensures peace of mind and protects both users and nature.
Step 5: Consider Portability, Storage, and Ease of Setup
If you plan to use your slackline kit in parks, while traveling, or want hassle-free setup, weight and packed size matter. Many kits come with a carry bag for easy transport and storage. Compare the packed dimensions and setup times of different slackline kit options. The best slackline kit for an active lifestyle is one that you can set up and take down quickly, whether at home or on the go.
Step 6: Compare Price, Warranty, and Customer Support
Cost is an important factor, but value matters more when choosing a slackline kit. Quality starter kits typically range from $70 to $120. Look for warranties and responsive customer support to protect your investment. Some brands offer free shipping or hassle-free returns, which can add significant value. Research the warranty details and support services for each slackline kit you consider to ensure long-term satisfaction.
Step 7: Read Reviews and Seek Recommendations
Before making your final decision, read verified user reviews for each slackline kit. Pay attention to comments about setup, durability, and customer service. Explore online forums and slackline communities for additional insights and firsthand experiences. A slackline kit with consistently positive feedback and active community support is more likely to meet your needs and provide lasting enjoyment.
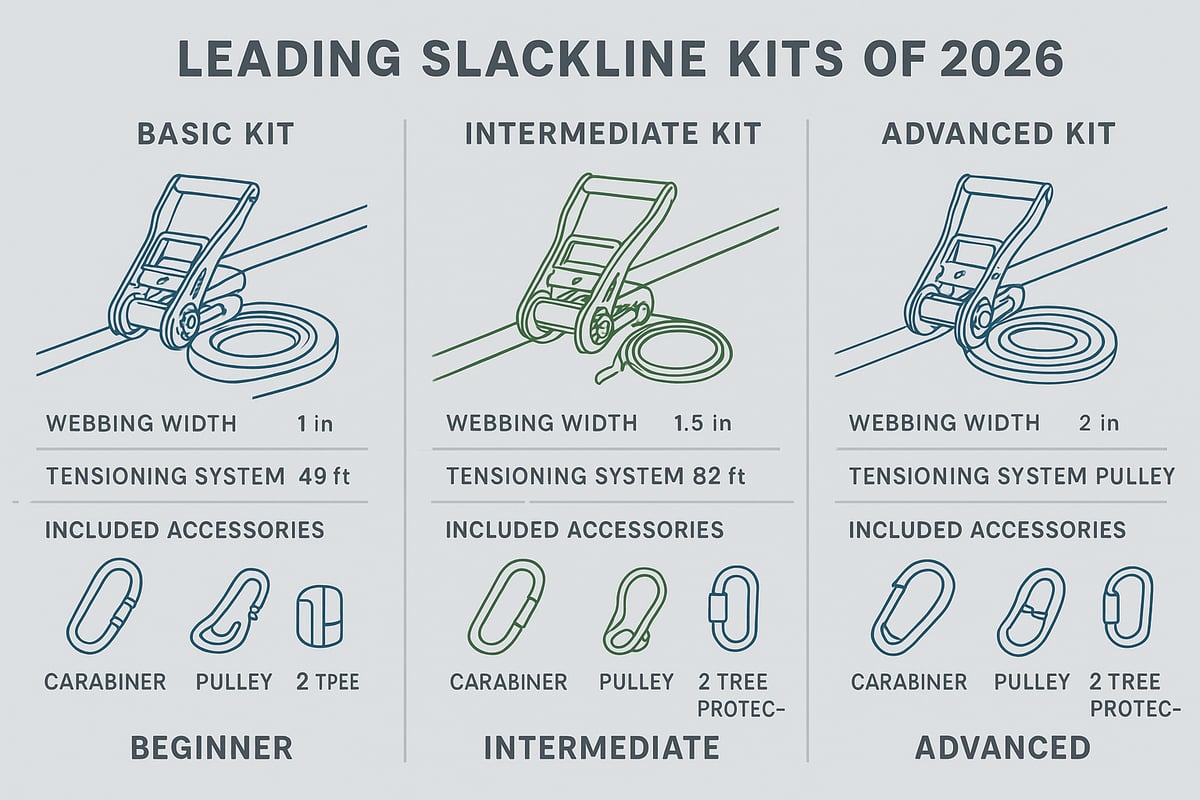
Comparing Top Slackline Kits of 2026
Choosing the right slackline kit in 2026 can be challenging with so many brands and options available. Whether you are a beginner or looking to upgrade, understanding the strengths and unique features of each kit is essential. Below, we break down leading kits, highlight their pros and cons, and provide a side-by-side comparison to help you make an informed decision.
Balance Community Starter and Longline Kits
Balance Community has established itself as a premier manufacturer for slackline kit options tailored to all experience levels. Their Starter Kit is ideal for beginners, offering 1-inch or 2-inch webbing, a straightforward primitive tensioning system, and robust tree slings. The Prim-25 and Prim-50 kits are designed for users progressing into longer walks and more technical lines, featuring longer webbing lengths and advanced tensioning hardware.
Key features include:
- Customizable webbing material and length
- Upgrade paths for accessories and tensioning systems
- Focus on durability and modularity
Pros:
- High-quality materials and craftsmanship
- Kits can be expanded as your skills grow
- Detailed guidance and community support
Cons:
- Primitive systems require manual tensioning and setup knowledge
- Higher price point compared to entry-level kits
Balance Community’s slackline kit options are ideal for those who value longevity and progression. If you are planning to grow in the sport, these kits provide a solid foundation and room to advance.
ENO SlackWire Slackline Kit
The ENO SlackWire Slackline Kit is a popular choice among recreational users and families thanks to its accessible design. This kit features 2-inch polyester webbing, a standard 49-foot length, and a user-friendly ratchet system for easy setup. It comes equipped with tree-friendly slings and a compact carry bag, making it highly portable.
Key specifications:
- 2-inch wide, low-stretch webbing for stability
- 300 lbs weight capacity for safety
- Tree protection straps included
Pros:
- Quick and simple setup, excellent for beginners
- Lightweight and easy to transport
- Positive user reviews for reliability and fun
Cons:
- Some users report difficulty releasing the ratchet after tensioning
- Less stretch in the webbing, which can limit tricklining performance
If you are seeking a slackline kit that delivers convenience and beginner-friendly features, the ENO SlackWire is a strong contender. It is especially well-suited for backyard play, park sessions, and family activities.
Other Notable Brands and Kits
Several other brands have made significant contributions to the slackline kit market in 2026. Gibbon and Slackline Industries, for example, are known for their vibrant color options, instructional materials, and active communities. Gibbon’s kits often feature robust ratchet systems and wide webbing, making them great for tricklining and group use. Slackline Industries emphasizes safety and educational resources, appealing to schools and clubs.
When shopping for a slackline kit, it is crucial to choose a reputable retailer that stands behind its products. For buyers seeking quality assurance, About Sideline Sport Supply provides insights into a trusted supplier with a strong commitment to customer satisfaction and authentic gear.
Unique offerings to consider:
- Kits with included instructional guides or mobile app support
- Extended warranties and responsive customer service
- Options for bulk purchases for teams and schools
Exploring these brands can help you find a slackline kit that fits your exact needs, style preferences, and budget.
Kit Comparison Table
Below is a summary table to help you compare the most popular slackline kit options side by side:
| Kit Name | Webbing Width/Length | Tensioning Type | Accessories | Price (USD) | Best For |
|---|---|---|---|---|---|
| Balance Community Starter | 1"/2" x 49' | Primitive | Tree slings, bag | $110 | Beginners, Progression |
| Balance Community Longline | 1" x 100'+ | Pulley/Primitive | Advanced anchors | $180+ | Longlining, Advanced |
| ENO SlackWire | 2" x 49' | Ratchet | Tree protectors, bag | $80 | Beginners, Recreation |
| Gibbon Classic | 2" x 50' | Ratchet | Instructional guide | $90 | Tricklining, Group |
| Slackline Industries Base | 2" x 50' | Ratchet | Tree slings, resources | $85 | Schools, Training |
This table provides a clear snapshot of each slackline kit’s main specifications, tensioning system, included accessories, price, and best use case. Use it as a quick reference to match your priorities, whether you are just starting out or advancing to more technical lines. By focusing on these key factors, you can confidently select the slackline kit that aligns with your goals and ensures safe, enjoyable sessions.
Safety, Setup, and Maintenance Tips for Slackline Kits
Setting up your slackline kit correctly is the foundation for a safe, enjoyable experience. Whether you are a beginner or an advanced user, taking the right steps at every stage protects both you and your equipment. Proper attention to setup, regular inspection, and ongoing maintenance will maximize the lifespan of your slackline kit and ensure safe sessions every time.
Safe Setup and Usage Guidelines
Every slackline kit should be set up with careful attention to detail. Start by choosing sturdy anchor points—healthy trees with trunks at least 12 inches in diameter are ideal. Always use tree protection pads to prevent damage to bark and roots, which helps preserve natural spaces for future slackline kit users.
Set the line at knee height for beginners and ensure the ground below is clear of rocks or debris. Follow these steps for a safe setup:
- Secure anchor slings and wraps tightly around each tree.
- Attach the slackline kit's webbing and ratchet system per manufacturer instructions.
- Tighten the line gradually, checking for even tension and secure connections.
- Test the setup by pressing down on the line before stepping on.
Always supervise children and beginners. Remind all participants to step off the slackline kit before another person gets on. These simple precautions reduce risk and build confidence for everyone involved.
Regular Maintenance and Inspection
Maintaining your slackline kit is essential for safety and durability. Before each use, inspect the webbing for frays, cuts, or discoloration. Check the ratchet, anchor slings, and all metal parts for rust or deformation.
A simple maintenance checklist for your slackline kit:
| Component | What to Check | Action Needed |
|---|---|---|
| Webbing | Frays, cuts, UV damage | Replace if damaged |
| Ratchet | Smooth operation | Lubricate or replace |
| Anchors/Slings | Wear, shifting | Retighten or replace |
Clean your slackline kit periodically using mild soap and water. Allow all components to dry fully before storage to prevent mildew and corrosion. Keep your kit in a dry, cool place, preferably in a carrying case. If you notice persistent issues or excessive wear, consult the manufacturer about repairs or replacements.
Troubleshooting Common Issues
Even with the best slackline kit, you may encounter setup or performance challenges. A frequent problem is difficulty releasing the ratchet. To address this, ensure the line is not under excessive tension before disengaging the mechanism. If the ratchet handle sticks, apply a small amount of lubricant and check for debris.
Webbing stretch and sag can affect your slackline kit's performance. If your line sags too much, increase tension in small increments, making sure not to exceed the recommended capacity. Anchor slippage may signal improper wrapping or worn slings—retighten anchors and replace damaged gear as needed.
Staying proactive with troubleshooting ensures your slackline kit remains safe and enjoyable. For more insights into international safety standards and the evolution of best practices, consider exploring the International Slackline Association's 10-Year Review.
Maximizing Kit Longevity
To extend the life of your slackline kit, always store it away from direct sunlight and moisture. UV rays can weaken webbing fibers, while dampness promotes mold and rust. After each session, coil the line loosely and avoid sharp bends that could damage the material.
Regularly rotate your anchor points and tree slings to distribute wear evenly. Clean metal parts and webbing after exposure to dirt, sand, or saltwater. Replace any component at the first sign of serious wear—prioritizing safety is key for every slackline kit user.
Upgrading or replacing your slackline kit becomes necessary when visible damage, persistent malfunctions, or advanced performance needs arise. Following these guidelines will help you get the most out of your slackline kit, supporting years of safe, rewarding sessions.
Advanced Slacklining: Progression, Tricks, and Community
Slacklining is more than just walking a line, it is a journey of skill, creativity, and community. As you move beyond the basics, your slackline kit becomes a tool for personal growth, challenge, and connection with others who share your passion. Whether you aim to master advanced tricks, join global events, or advocate for responsible slacklining, the right approach and resources will elevate your experience.
Progressing Beyond the Basics
Developing advanced skills with your slackline kit requires dedication and structured practice. Start with balance drills, such as slow, controlled steps and static holds, to refine your technique. Gradually increase the length and tension of your slackline kit to challenge your abilities.
Once you feel confident, try turns and directional changes. Practicing on longer lines or different webbing types helps you adapt to new setups. Many enthusiasts upgrade their slackline kit as they progress, choosing specialized equipment for longlining or tricklining. Consistent training not only boosts your performance but prepares you for more demanding disciplines.
Introduction to Tricks and Freestyle Slacklining
Freestyle slacklining brings creativity and excitement to your practice. With a suitable slackline kit, you can learn beginner tricks like knee drops, sit starts, and simple jumps. These moves require a stable line, proper footwear, and, for safety, padded landing zones.
As you advance, consider using a slackline kit designed for tricklining, offering higher tension and dynamic webbing. Always prioritize safety by wearing pads and using spotters, especially when attempting new tricks. Online tutorials and local workshops are invaluable resources for learning proper technique and progressing safely.
Joining the Slackline Community
Connecting with the slacklining community enhances your journey with any slackline kit. Online forums, local clubs, and international events provide opportunities to share tips, find training partners, and celebrate achievements. Community engagement fosters motivation and opens doors to group sessions or workshops.
Slacklining’s recognition as a legitimate sport has grown rapidly. This is highlighted by UIAA's Inclusion of Slacklining, which demonstrates the sport’s increasing acceptance and the value of community support. Sharing experiences with others helps you learn, stay inspired, and contribute to the sport’s future.
Environmental Stewardship and Responsible Slacklining
Using a slackline kit responsibly is essential for preserving natural spaces. Always use tree protection to prevent bark damage and soil compaction. Practice Leave No Trace principles by minimizing your environmental impact and respecting park rules.
Community initiatives often promote education on safe and eco-friendly slackline kit use. By advocating for public access and supporting stewardship programs, you help ensure the sport remains sustainable and welcomed in outdoor spaces. Responsible slacklining protects both the environment and the reputation of the community.
The Future of Slacklining in 2026 and Beyond
The slacklining world continues to evolve, with new materials, smart technology, and broader participation shaping the future of the slackline kit market. Trends indicate growing accessibility, with more user-friendly kits and resources for all ages and skill levels.
Recent data from Extreme Sports Participation Statistics 2025 shows an upsurge in slacklining’s popularity, reflecting its appeal as both a recreational and competitive activity. As the community grows, stories of innovation and inclusivity inspire newcomers to join and contribute to the sport’s ongoing progress.